use cmake to create visual studio projects out-of-source
In the following article we describe how to build Visual Studio projects with CMake out-of-source with still being able to maintain the particular folder structure of our source code. Also, we will be able to transmit changes directly to our src folder when working with Visual Studio.
CMake in-source building
CMake is a powerful tool to automate building of projects (e.g. C++ projects) or to generate workspaces/projects for particular IDEs in the first place. One issue, though, is that building a project with a given CMakeLists.txt files will drop all the CMake outputs and project outputs into the particular source folders, which is called in-source building. For example, lets say you have the following, simplified, project structure:
/project
    /src
        /package1
        /package2
    /doc
    CMakeLists.txt
Now, you call
cmake .
in the folder /project/src with Visual Studio as your default IDE and compiler. As a consequence, a lot of output folders and files like CMakeCache.txt, Project.vcxproj, Project.sln, ALL_BUILD.vcxproj, ALL_BUILD.vcxproj.filters, Debug, Win32 and many more will be created. Of course, which files and folders are created depends on your particular project configuration. However, you will have many files which you need but which you actually would like to be put into some separate folder to keep your src folder nice and clean. Luckily for us, there is a way to accomplish exactly that.
CMake out-of-source building
A common way to encounter the issue of untidy src folders as consequence of a build is the so-called out-of-source build. If we have our project structure and need a build, we simply accomplish this by switching to a separate folder and build from there. So, we create a folder build, for example just below /project so that we get the following structure.
/project
    /src
        /package1
        /package2
    /doc
    /build
    CMakeLists.txt
(Of course, we can also have some other place for that directory; the build directory is usually not committed to the users anyways).
Now, we switch to that directory and call cmake ../src. All of the build and cache files are created now in that build directory and our src folder remains quite clean. Great, isn’t it?
In general, we have accomplished what had been our desire. If we would like to work with the resulting project in Visual Studio, we can admittedly compile this and create our binary files – but we cannot add files and subdirectories in a nice manner and replicate our changes back to the src folder that easily. One might argue that the purpose of CMake is not to use the resulting projects in terms of a development environment, anyways. Then again, CMake is certainly a powerful tool to create projects with correct paths to different libraries with little effort that can also call other build tools (e.g. qmake). CMake makes setting up an environment substantially easier that way. This is especially true if one works with QT, where the build tool does not work smoothly all the time when creating the so-called moc files. But this a topic for another article.
Anyways; for these reasons, I think it can make a lot of sense to work with CMake to also create projects as basis for your development and not just for building.
But if you open your created solution, you will notice that all the files are on the same level. Visual Studio does not reflect our folder structure including the directories package1 and package2. There are no filters generated. This would be fine if we could switch to the “Show all files” view and just watch the files being in the corresponding folders. However, this does not work, either, Visual Studio just has a number of file links to the files being in /project/src without any structure. So, what do we do?
Out-of-source building with valid Visual Studio C++ project
Common workarounds here involve extending our CMakeLists.txt file to create filters in Visual Studio, or just add files to our project in Visual Studio and, for each file, set the directory of the file directly. Still, having a project with 500 files in a well-organized folder structure makes working without this folder structure quite exhausting. One could also put the files into the src directories, call CMake again and work with the new project. All of these ways seem quite cumbersome to me, though, which is why I have come up with a more pleasant solution.
First of all, we should ask ourselves: Why does Visual Studio just not work as it should? If we build in-source, the project works just as expected. In that case we would have our mess in the src folder, though. So, what should we do? It seems as if Visual Studio can only work with the correct folder structure, if the underlying src folder is below our project files. So, that’s great. Copying all our src files into our build directory would be an apparent solution! Now, if we make changes, we just would need to copy the src folder back and change our CMakeLists.txt. But this does not sound any less inconvenient…
It would be better if we just had a working copy. Luckily, Windows (and Linux) offer so-called symbolic links (symlinks). These are references to other directories but will be handled as if they were real directories. Since this article is about Visual Studio, we assume a Windows environment. Lets create a symlink for our src folder below our project. We will also create a symlink for our original /project/src/CMakeLists.txt to /project/build/CMakeLists.txt. Otherwise CMake would still use /project/src instead of /project/build/src and the references to our source files would, again, be associated with /project/src and therefore not used properly by Visual Studio. So, first we should start our command line. For that, we can either open the directory in Windows explorer, hold shift, right click and open the command line there or use Windows Key + R and type cmd. Then, we use the following commands:
C:\Users\Michael\project> mkdir build && cd build
C:\Users\Michael\project\build> mklink /D src ..\src
C:\Users\Michael\project\build> mklink CMakeLists.txt ..\CMakeLists.txt
C:\Users\Michael\project\build> cmake .
Et voíla. We can open Project.sln now. We do not have filters but in my opinion using normal file system folders has many advantages anyways. To work with them, we can just switch to the file system view of our project as shown in our screenshot:
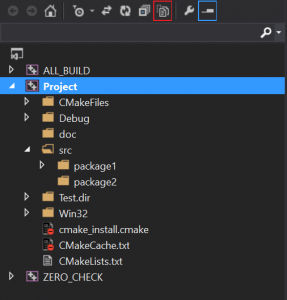
We can also change our CMakeLists.txt this way without having it added to our project itself.
Conclusion of out-of-source building with symlink
Now, we can compile our project just like if it was created in-source. We see a very logical directory structure that directly maps to what we see in the file system and any builds leave our src directory untouched. What’s more, we can even add new directories or source files in Visual Studio. These changes will be put to /project/build/src but since this directory is a symlink, all the changes are automatically transmitted to /project/src, which is exactly what we want. Of course, we still have to adjust our CMakeLists.txt if we add new files but this seems to be a stylistic benefit anyways.
I hope that this article was of use for you. For myself this seems to be the most convenient solution to work with CMake in combination with Visual Studio. And as already said before, it works perfectly fine and even creates more advantages when used with libraries like QT that have their own built tools like qmake.
Any feedback, questions or ideas are highly welcome!
So long, Michael